Simple WEB server hosted on NXP/Freescale FRDM K64F demo board
Kinetis K64F demo board is excellent little board for experimenting with ethernet. There is no quick step-by-step tutorial for building simple web server on this board. The following instructions help bringing working HTTP server on FRDM K64F with one index page and second page with simple CGI script to print out some random numbers. This is absolute minimum for developing any web based gadget with this board.

(image source: https://mcuoneclipse.com/2014/04/09/ftf-frdm-k64f-kinetis-design-studio-and-kinetis-sdk/ )
What you will need:
- Compiling tool: Keil development tools
- Hardware:
- Good to read: HTTP server demo application
- LAN cable and spare port on your switch or router
First start new project, select MK64FN1M0VLL12 and keep default settings except in the tab Utilities, Configure Image File Processing (FCARM). More about this later.
Next, select all required packs for the web server application:
CMSIS, CMSIS Driver for ethernet MAC and PHY:

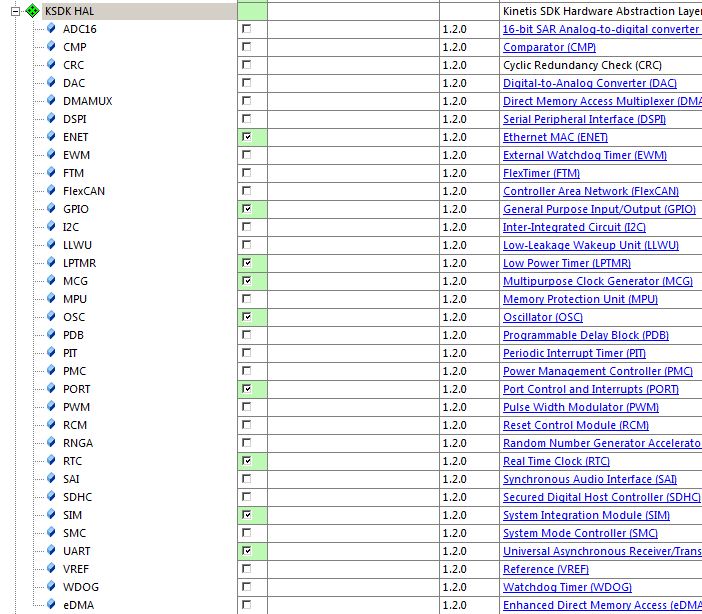
Select Kinetis SDK Framework packs:

Select Kinetis SDK HAL drivers:
Select additional SDK packs:
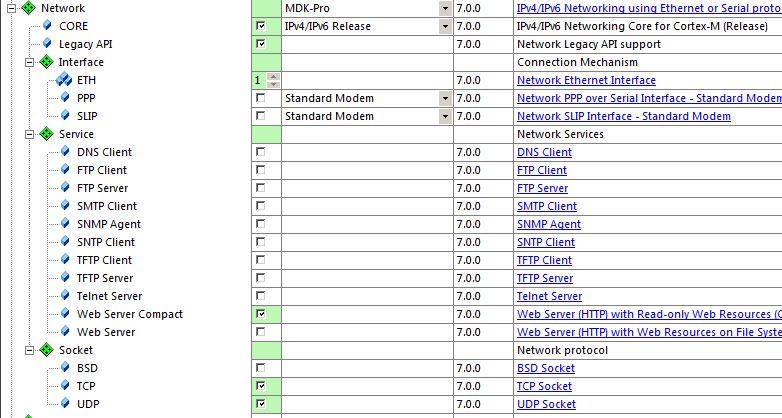
Finally, select Network packs:
In project explorer add two groups: “SRC” and “Web files”:

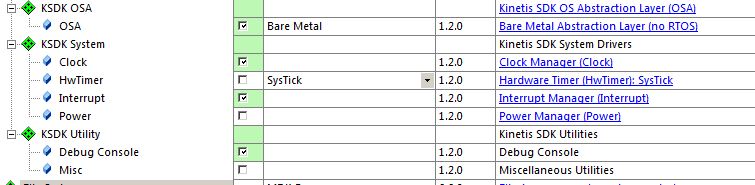
Configure RTOS in group CMSIS, file RTX_Conf_CM.C:

In the group Device edit RTE_Device.h, enable MAC and select RMII mode and OSCERCLK for clock source:

Edit file hardware_init.c and put following code in this file:
#include "board.h" #include "pin_mux.h" #include "fsl_clock_manager.h" #include "fsl_debug_console.h" void hardware_init(void) { /* Disable Memory Protection Unit */ MPU->CESR &= ~MPU_CESR_VLD_MASK; /* enable clock for PORTs */ CLOCK_SYS_EnablePortClock(PORTA_IDX); CLOCK_SYS_EnablePortClock(PORTB_IDX); CLOCK_SYS_EnablePortClock(PORTC_IDX); CLOCK_SYS_EnablePortClock(PORTD_IDX); CLOCK_SYS_EnablePortClock(PORTE_IDX); configure_enet_pins (0); /* Setup board clock source. */ g_xtal0ClkFreq = 50000000U; g_xtalRtcClkFreq = 32768U; /* Init board clock */ BOARD_ClockInit(); dbg_uart_init(); } |
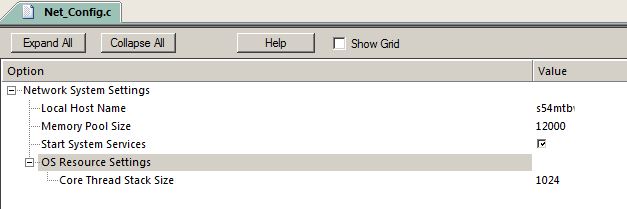
In the group Network edit file Net_Config.c. Enter Local host name, memory pool size, enable system services and adjust core thread stack size:
Edit ethernet configuration in file Net_Config_Eth_0.h with the addresses suitable for your LAN for IP v4 and v6:

Enable all legacy callbacks in Net_Config_Legacy.h This is required to enable backward compatibility with legacy API.
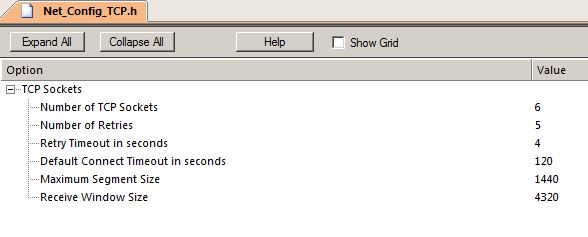
Configure TCP layer in file Net_Config_TCP.h:
Adjust UDP sockets to 5 in file Net_Config_UDP.h
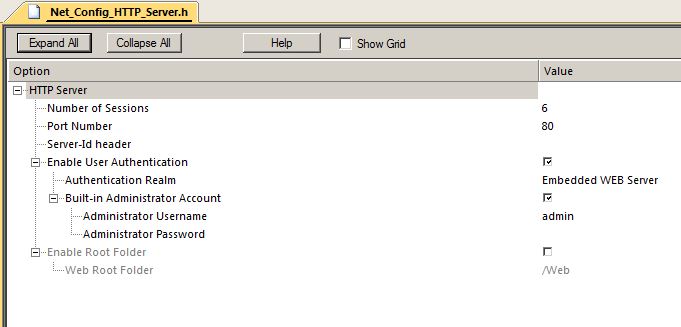
Edit HTTP server configuration in file Net_Config_HTTP_Server.h :
Final settings is in the project settings, tab Utilities, Configure Image File Processing (FCARM): enter web.c for output file and select file group where to place the generated source file. Define the root folder for image files. The “image” files are all files with the web page content. The FCARM will automatically translate those files to array in target flash memory.

Now it’s time to add some code.
Add main.c to group SRC:
#include "cmsis_os.h" /* CMSIS RTOS definitions */ #include "rl_net.h" /* Network definitions */ #include "board.h" /* BSP definitions */ /*---------------------------------------------------------------------------- Main Thread 'main': Run Network *---------------------------------------------------------------------------*/ int main (void) { hardware_init(); net_initialize (); while(1) { net_main (); osThreadYield (); } } |
Add main web page in file index.htm and add it to group “Web files”:
<head> <title>S54MTB Testing Web server</title> </head> <body bgColor=#ffffff > <div align=center> The web server is working :) <br> </div></body> </html> |
Now it’s time to compile and make the project. At first it will take a bit longer. If everything is OK, the project will compile to about 70k of code, 4,8k RO data for web content, requiring about 38k of data.
Next step is to add some dynamic content.
Edit index file and add one additional link to the file test.cgi:
<head> <title>S54MTB Testing Web server</title> </head> <body bgColor=#ffffff > <div align=center> The web server is working :) <br> <hr> <a href="/test.cgi">Test - dynamic content</a> </div></body> </html> |
add file test.cgi to group “Web files”:
t <html><head><title>Test CGI</title> t <meta http-equiv="refresh" content="5"></head> t <h2 align=center><br>Test CGI --- print some RND numbers</h2> t <center> c r c a t </center> t </html> . End of script must be closed with period. |
Few words about Scripting Language for the Common Gateway Interface (CGI) – from keil documentation:
CGI is a standard method used to generate dynamic content on web pages. CGI stands for Common Gateway Interface and provides an interface between the HTTP server and programs generating web content. These programs are better known as CGI scripts. They are written in a scripting language. The Network Component provides such a scripting language. The HTTP server processes the script source file line by line and calls the CGI functions as needed. The output from a CGI function is sent to the web client (browser) as a part of the web page.
Each script line starts with a command character which specifies a command for the script interpreter. The scripting language itself is simple and works as follows:
i The script interpreter include a file from the file system and sends the content to the web browser.
t The line of text that follows will be sent to the browser.
c Calls the function netCGI_Script from the HTTP_Server_CGI.c file. It may be followed by a line of text which is passed to netCGI_Script as a pointer to an environment variable.
# This is a comment line and is ignored by the interpreter.
. Denotes the end of the script.
Note
The script files need to use the reserved filename extension of cgi, for the HTTP server’s script interpreter to recognize and process the files accordingly.
The script line length is limited to 120 characters.
Our example above will call function uint32_t cgi_script (const char *env, char *buf, uint32_t buflen, uint32_t *pcgi) ;
We should add interpreter for the CGI calls by rewriting this function. Add file http_cgi.c to group SRC with following code:
#include <stdio.h> #include "rl_net.h" #include "rl_net_lib.h" #include <stdlib.h> // rand() // Generate dynamic web data from a script line. uint32_t cgi_script (const char *env, char *buf, uint32_t buflen, uint32_t *pcgi) { uint32_t len = 0; switch (env[0]) { case 'r': // testing ... write random number len = sprintf (buf, "Tralala Random number between 0 and 50 is %d !!!<br>", rand() % 50); break; case 'a': // Write some text len = sprintf (buf, " Hopsasa Random number between 50 and 100 is %d !!!<br>", 50 + rand() % 50); break; } return (len); } |
Our new little web server will now respond with the following two pages:


This simple web server project for FRDM K64F will be soon available on GIT repository.
Hello,
I have some problems with running this project (linker errors). Could you please update the GIT repository link with your complete project so I could use it?
Thanks in advance,
Maciej
Thank you for info. I will check.