Specialized e-bikes utilize control cables with a braided wire construction that exhibit a lower tolerance for mechanical stress and extended vibration compared to more industrial durable options. These cables, specifically those associated with the handlebar-mounted remote buttons, are susceptible to fatigue-induced failure due to their fine gauge and hard braided design. This can manifest as button malfunction after a period of sustained use, as experienced in my case after two to three years of riding.
And now the sad part of the story… Replacement part price. For 130 euros, those buttons better come pre-attached to a small gold-plated unicorn. Four buttons? Absolutely criminal!
Disassembly:
Housing Access: The remote enclosure utilizes a sonic welding technique, essentially creating a permanent closure between the two halves. Destructive disassembly is required. A thin, flat-head screwdriver can be used to carefully pry open the housing seam, but caution is necessary to avoid damaging the internal flexible printed circuit board (FPCB).
Cable Removal: Once the housing is breached, the control cable can be severed near the entry point. This allows for the complete removal of the remote unit.
Sealant Removal: The remaining challenge lies in the removal of the silicone sealant. This process requires meticulous cleaning with a sharp tool to scrape away the adhesive from the wires and FPCB. Special attention should be paid to the vicinity of the soldering pads on the circuit board, as these delicate components are susceptible to damage from excessive force.
In past I assembled small SDR receiver based on Raspberry Pi and SDR USB dongle based on software developed by PA3FWM. The problem was with limited usability by multiple clients connected to the Raspberry pi at the same time. The old SDR was retired and put aside for few years.
Then András Retzler ha7ilm developed (and stopped developing) OpenWebRx, which was the base for now regulry maintained and further developed OpenWebRx.de.
I recently built homelab server based on “proper” server infrastructure with plenty of RAM and lots of processing cores. I decided to setup OpenWebRx in one linux virtual machine with raspberry pi only as remote receivers serving single user (server itself).
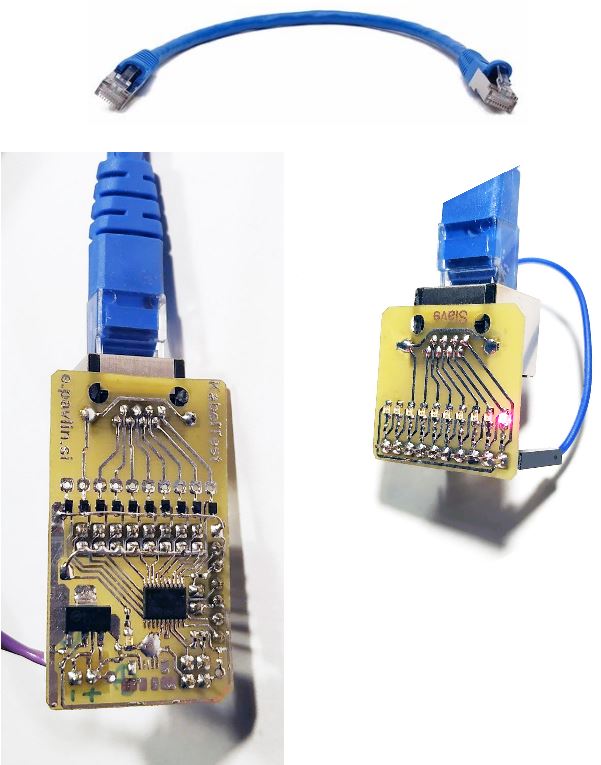
This is simple cable testing tool for checking your cables (e.g. ethernet patch cables or house installation). Complete tester consists of two modules and tested cable. Master (left) module is on the left. It is connected to the power supply (battery or wall adapter). Slave (right) is passive and has only LEDs.
Photoelasticity is wonderfull phenomenon. It describes changes in the optical properties of a material under mechanical deformation. It is a property of all dielectric media and is often used to experimentally determine the stress distribution in a material, where it gives a picture of stress distributions around discontinuities in materials. Photoelastic experiments (also informally referred to as photoelasticity) are an important tool for determining critical stress points in a material, and are used for determining stress concentration in irregular geometries. [https://en.wikipedia.org/wiki/Photoelasticity]. Experimenting with photoelasticity photography gives some nice photos at least. It is usefull tool for visualisation of the internal stresses within (transparent) material.
There are many steps from c source code to cloud data storage. Let’s start…
“To get the end, you must go back to the start” – Grandmother Yelsh
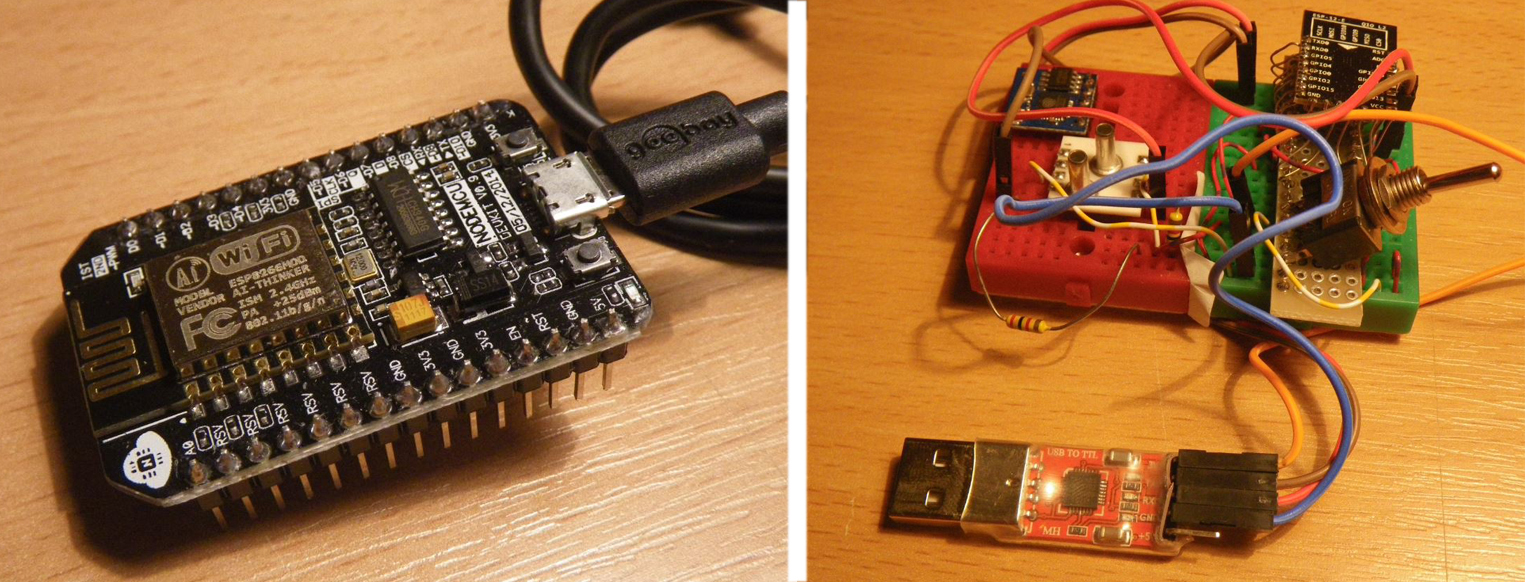
In this contribution I will describe how I started using Espressif ESP8266 with Eclipse and some other details how to store data in “usual” web server. I will not talk about the hardware too much. To follow the tutorial it is enough to have any ESP8266 module connected to serial port on PC either via USB/UART virtual cvom port or directly (rare these days). Two most common possibilities are either module with the USB/UART integrated on-board or separated USB/UART + ESP8266-xx module (usually on breadboard with some additional periphery):
Embedded board arrays in altium could be used for creating panels for multiplication during prototyping. Here is short illustrative example. In this example we will:
Smart nesting box is small wooden box for nesting birds. It is equipped with the live camera feed and some sensors. Four smart nesting boxes were made and three of them were placed in the wild. One was inhabited with the great tit in te early march 2017. After that, the bird laid 11 eggs. The bird then incubated eggs for 12 days. On the Easter Monday, the first shells cracked and newborns started poping out of the eggs.
I prepared the whole project for local school. The nesting boxes were made by 8 children aged from 11 to 14 during afternoon classes. It was great fun and the young scientists learned many new skills from electronics, materials, hand tools, crafting, programming, components, circuit design, biology, photography, physics, etc… The nesting box is described in detail here with all necessary production steps. Contact for further info is m@v4.si. The three nesting boxes placed in the wild have…
I recently received 1m of APA102C led strip with 144 leds per meter. I want to use the strip for rotary POV display so I cut the strip in half and tested the performance with a STM32L476RGT nucleo board. The results of the tests are surprising and very promising for my application.
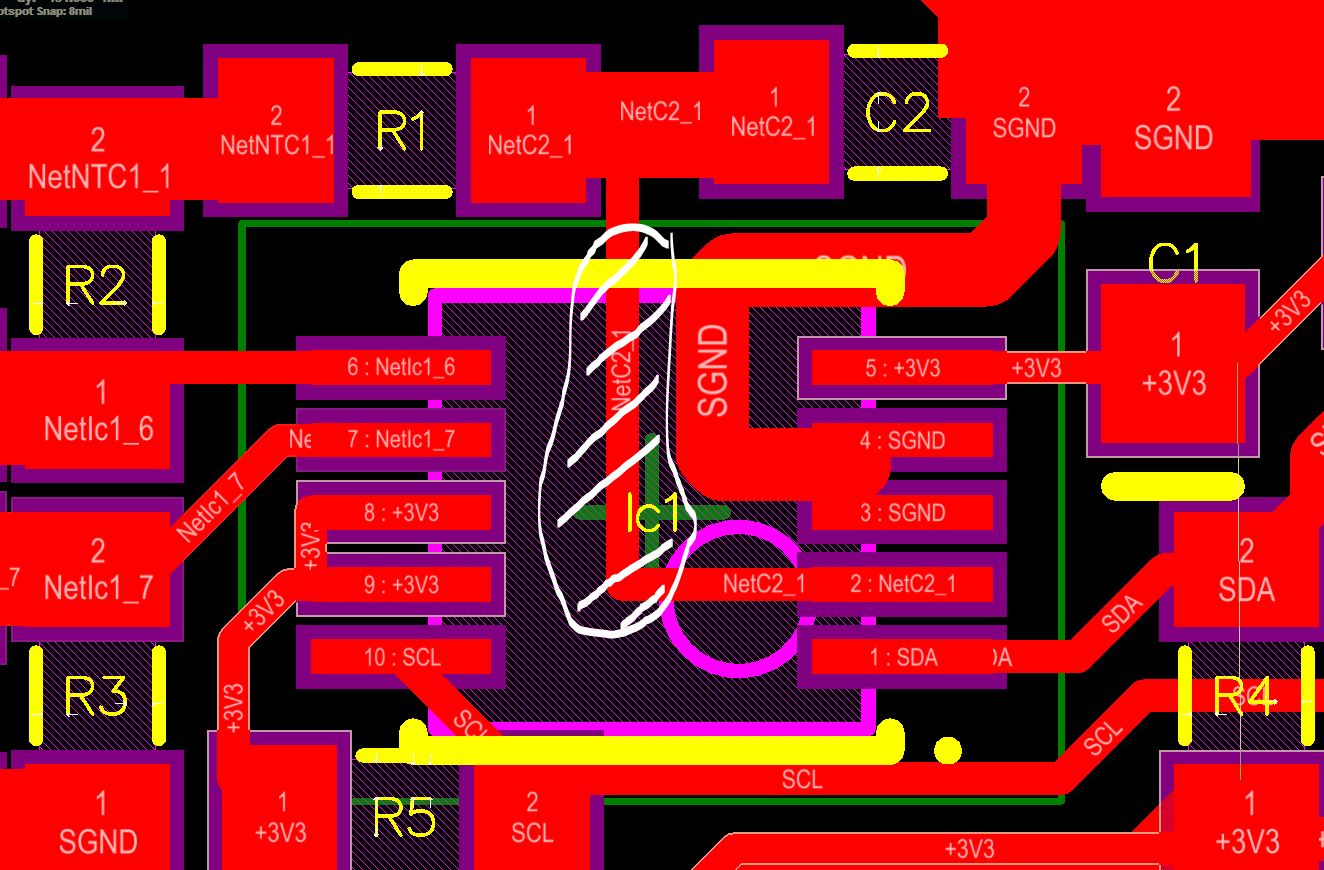
New revision of Si7013 sensor module – machined boards
The boards are solder “plated” and prepared for assembly process. However, there is one issue with Si7013. It comes in SMD housing without leads. This is no big trouble, but the thermal pad is, because there is trace routed under the Si7013, which is not GND:
The “problematic” trace is white hatched.
That means it must not be soldered to thermal pad. The good thing is, the thermal pad can be left floating.
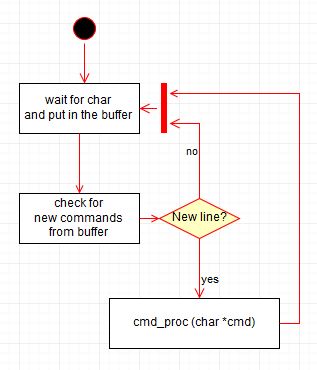
Microcontroller with serial bus or USB CDC (virtual COM port) is usually connected to some terminal. User then type commands and firmware in the microcontroller interprets entered commands.
Developing simple interpreter is not very scientific task, more like PITA with repeating chunks of the code. After couple of successful projects with such interpreter I can say my code is somehow tested and proven in the practice. Now I prepared one application which can shorten development process and make my life easier when I start application in new device.
The source code generator generates only command line interpreter. It provides all identifiers for selected commands, provides function prototypes for each command and text template for help. Finally only the functions for executing specific commands should be then implemented.
The final application can be either multi-threaded with RTOS, or flat single thread. In both cases, there should be some function or ISR checking for new char and feeding this char to the command line editor. When new line “arrives”, the function cmd_proc() is called and then the magic happens.
General structure of the caller thread or application